Image Map

How to Use 8.5x11" Digital Papers to make Square Images without Distortion

Hello!
This is just a quick post addressing the issue of image distortion. Image distortion happens when we stretch or shrink an image, changing its original aspect ratio (i.e. original width x original height). If this ratio is maintained despite enlarging or shrinking an image, then the image will appear normal - just bigger or smaller.

So, when you resize an 8.5x11" image by holding the shift key and dragging its corner larger or smaller, its original aspect ratio will be maintained, and the image will still "look right."
But what about when you need to resize an image and can't maintain its original aspect ratio? What if you have a hundred 8.5x11" digital papers that you'd like to use in square images?
Most of us would try to insert the 8.5x11"image into the 10x10" artboard (or in this case, Powerpoint slide), then stretch the image to fill the white space.
This looks pretty bad.
It does.
Here's a simple (I hope) way to use those portrait- or landscape-orientation (8.5x11") digital papers to make square images without ending up with an image that looks stretched. (It will work best with abstract patterns.)
As a preface to these instructions, I want to add that I'm not sure if these instructions will fall under the umbrella of "altering clipart." For my papers, feel free to alter their size so that they're usable for your project. Just don't stretch them. THAT'S the thing that makes images look bad!

**This tips 'n tricks post is for Microsoft Powerpoint users.**
----

I made this festive, golden bubbly paper inspired by New Year's Eve...
Golden Bubbly Paper - Grab this FREEBIE Here

but it's 8.5x11". (I did this on purpose because I needed this size for another project.)
BUT, I'm concerned that it won't be usable if the end-user needs it for square images.

So I found a way, and want to share that way with you.
Commence instructions (in Powerpoint 2007):

1. Start a new Powerpoint and resize the slide to desired square size - I like 10x10.
Design Tab-->Page Setup-->Width: 10, Height: 10

2. Insert image --> Search your computer for the desired image, and select Open.

3. Here's my 8.5x11 Landscape orientation bubbles image on a square slide:

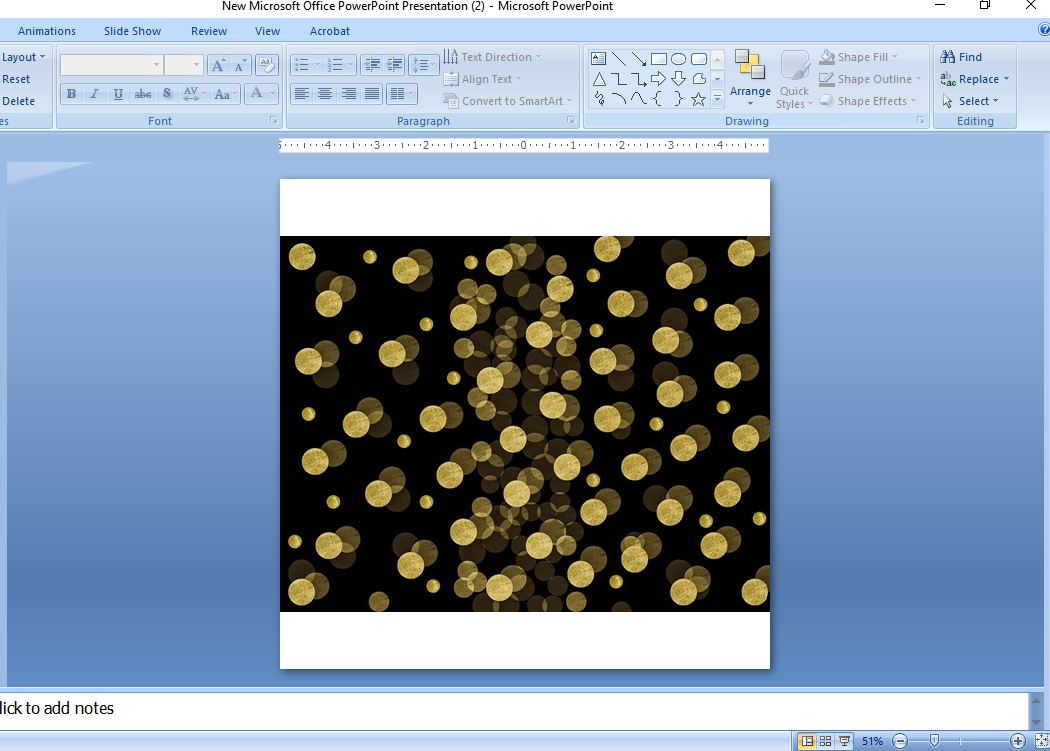
Boo. Sad. It doesn't fit.

Here's what it looks like when I try to drag the top and bottom of the image to fit the slide:

Boo. Sad, too, because the bubbles are obviously stretched.
This stretched-looking image is actually not half bad, but not ideal. The aspect ratio has been changed (since I didn't hold down the shift key when I dragged the edges to fit). But some end-users might be peeved by this distortion since they paid good money for gold papers for their New Year's Eve-themed projects. 
Grr. I don't like buying something that I can't use!
So here's a solution that might be pleasing to end-users.

1. Hold down the shift key and drag a corner (any corner) outward to resize it larger. 
In the image below, I'm holding the shift key while dragging the bottom-right corner outward from the image to make it bigger. Holding the shift key maintains the aspect ratio... which is what we want. I didn't fill the slide completely in the image below so you could see how much bigger than the slide that the image will get. 
The image being way bigger than the slide is OK for now. We'll deal with it soon. (And now I'm going to go and fill the rest of the slide.)

2. Now that your square slide is completely filled (or way overfilled I should say), it's time to drag your image to the slide's center. In this particular bubble image, it'll be important to keep the center of the image in the center of the slide, simply because its focus is on this center cluster of bubbles. The grouping of center bubbles should stay in the center, unless you like the off-center look, which is just personal preference. 
If you look closely, you can see the image guide at the top-center of the image aligns with the 0" on the ruler above. This is how I can tell that my image is centered. (Good 'nuff!) 

***EDITED NOTE: At this point, you can save this image as a PDF and the sides will be shaved off automatically. If, however, you're trying to end up with a .png or .jpg image for, say, a sales ad, or a blog image, keep reading for the cropping instructions.********

3. Next we're ready to crop the right and left sides so this image becomes the perfect square that we want. It won't look the same as the original, and that's OK with me as long as the bubbles are not stretched, oblong, and therefore distorted. 
So right-click on the image and choose "Size and Position" like below.
Then you'll get this dialog box where you can play with the cropping of the left, right, top, and bottom sides.
"Size and Position" Dialog Box
I was able to shave off 1.8 " from each of the right and left sides to fill my 10x10" slide perfectly. I had to press the up arrows in the Crop section to achieve this. 
And now my new image, which was once 8.5x11", is now 10x10" and looks like this:

10x10" Square Image After Cropping Sides

Original 8.5x11" Image Before Cropping Sides

The square image looks nice, but is zoomed in (larger) with sides shaved off. This strategy definitely opens doors to the end-user, finally letting them put those abstract patterned, landscape/portrait-oriented digital papers to work in their square sales images, blog images, or what have you. 

I hope this is helpful!

I'd love to hear from you in the comments below. Do you run into the issue of needing an image for a project that distorts it? I'd love to hear about your tips and tricks for handling this problem.

Thanks!


Product in this post:


Combining Words Their Way and Daily 5 in 2nd Grade


In Room 32, we do Daily 5 for our literacy block. 
Rather, I should call it a "Daily 5-ish" as I've heard it called in the past.

This post is about how I manage 5 (actually, it's more like 7 currently) different levels of Words Their Way phonics instruction in my classroom each week. I'll definitely write more about my "Daily 5ish" in another post soon.

Back to Words Their Way.
If your reading series doesn't help you by including robust phonics instruction, I recommend researching Words Their Way. It's research-based. By that, I am referring to their placement inventory. I'm no pro at interpreting p-values and r-scores in statistics (did I say that right?), but the short of it is: they've done their homework and they share it with you in the teaching manual. This makes me happy. I like research-based information. I like to be able to backup my decisions with sound reasoning. 

Their placement inventory is a spelling test of 25 words progressing from simple to difficult, from initial and final consonants to Greek and Latin root recognition. They include class composite graphs that I love because they allow me to compare my students side-by-side (which helps with grouping), and see how my class is improving in their phonics skills from one inventory to the next - slow but sure. 
(Some students make enormous leaps that I just can't explain, while others work painstakingly hard on each and every little phonics sound and spelling pattern in order to make growth. Still, there are those students who need repeated review to help them remember phonics rules and hear letter sounds - bless their hearts. You probably have a few of them, too.)

I {giant heart} Words Their Way so much!
I really do.
 I learned about them as a student at Purdue, but didn't have real students to help me put the need for phonics instruction into perspective, so it was just another boring book at that time. But now, as a real teacher, I've had enough students who progress in reading but spell atrociously to convince me that phonics instruction and daily practice with words sorts is an important part of smart, effective, primary instruction (and beyond - but primary is my focus). Those readers who progress but spell atrociously would progress more if they could decode better - something phonics instruction supports.

Two Reasons I love Words Their Way:

1. They've done the thinking for me. 
Aside from the time it takes to score the placement inventory, analyze the scores, make groups, and decide in which stage to begin those groups (usually something that takes me a Saturday and maybe part of Sunday - around 4-5 different times during the school year depending on my curiosity and the students' development), they've done all the thinking for me. After my groups are made, all I need is 12 minutes each week to copy each group's word sort for that week. Considering I'm managing 5 (+2 stragglers) phonics groups, this is relatively little weekly prep. I make double copies and send everyone's sort home with them because families get a little freaked out when there isn't a spelling list they're supposed to practice. 
So, 
even as the teacher who streaks into the parking lot 15 minutes before the day begins, I manage to run off my phonics sorts in time.

2. They're organized in a step-by-step way which helps me rest easy.
I progress step-by-step in Words Their Way - at least between reassessments. (Some don't. Some skip around as they see fit for their groups. However your mind & methods work for you is acceptable.) I test, place, and teach for an entire quarter. Then test and place again. Groups are supposed to be fluid so students who catch on quickly can be moved ahead. But I don't shift students around like that. They test. They place. They learn with their group until I retest and re-"place" them again. I think doing 4-5 different test throughout the year provides all the shifting necessary for the different speeds at which students progress.
For example, this week green group does Blue Book Sort 4 (B4). Next week, B5. Then B6. I don't skip. I trust in the authors, that their strategic combinations and comparisons of spelling pattern rules is necessary and beneficial; finding gaps and filling them.
(Ok. I'm really a flexible person but am making myself seem very rigid! If a student needed to be shifted to another group, and it was glaringly obvious, I'd do it. But that hasn't happened yet. But this is why I believe in frequent retesting/regrouping.)

I don't want this post to go too long for you, but I wanted to add how I manage so many different levels (and why I feel 7 levels are necessary for us, at least right now).
First, I introduce everyone's sort on Monday. Since I do Daily 5, I'm able to teach 5 different sorts at my kidney table. On Tuesday-Thursday during Word Work, they practice their sorts (and spelling their words) independently or with a partner per our posted weekly routine. On Friday, I meet them again at my kidney table, and test each different group during each of the five Daily 5 rounds. 

I'm afraid that part only makes sense to people who know what Daily 5 is!

But something's not adding up, right? You said you taught 7 different groups, didn't you?

Yeah, that's what I said. 
This part gets a little tricky but I think it's necessary. Would it work in every classroom? No. I know my class, though, and I know that my highest groups learn their sort in about 8-10 minutes, and I have an extra 10-12 minutes to kick back, sip coffee, and pin stuff 'til the next Daily 5 round, right?

HA! 
Yeah right.

What do I do with that extra 10-12 minutes after my high groups finish? Throw in a couple of 1-man groups, i.e. my +2 "stragglers." Right now, one of them is a Level 1 ESL student from China who works hard and is learning fast, is solid on his initial and final consonants, but emerging in his medial short vowel sounds. (Obviously. He doesn't pronounce them the same as us. It's difficult to hear the short i when it sounds like /eeeeee/!) And the other student is below grade level on all accounts. He works hard and wants to catch up, but the fact is, he needs repeated instruction hearing medial short vowel sounds, even as a second grader, even with remediation. They're in roughly the same place, so I give them the same sort each week. My ESL student gets a word sort AND a picture sort to help with his vocabulary. Yep. Two sorts for him. And he learns fast and seems to enjoy it so I don't feel like it's too much.

SALES ALERT: These are my two sweethearts who inspired my Short Vowel Spinner & Tile Activities. They like each other despite their, let's say spirited personalities, so they play these games against each other, and I test them at the end of the week. It pleases me so to see them both hearing medial short vowel sounds, and working at it! 
"Peeg! P-i-i-i-guh!" 
Once they're solid, they can continue on, comparing short and long vowel sounds. 

Do you ever have those challenges in the classroom that hold your heart and your focus and all of your hope? 
Then you know what I'm talkin' about.
I can't wait for their retest!!! EEK! Two more weeks!

OK. I said I wouldn't go crazy and write too much, but I have. 

Stay tuned for more in my Words Their Way series!
Follow me on Bloglovin' to receive these Words Their Way series posts right away.

Cheers!

Products mentioned in this post:


Short a Spinner & Tile Activities
Short e Spinner & Tile Activities
Short i Spinner & Tile Activities
Short o Spinner & Tile Activities
Short u Spinner & Tile Activities


4 Christmas Ornaments for the Elementary Classroom


This week, I'm linking up with the Teaching Trio and their holiday themed Favorite Things Linky. I'm excited to be writing again, and happy to share a few of my favorite things. This month, the theme is
Holiday Things.
My favorite holiday things are:
My daughter's classroom-made Christmas ornaments.
They've added special memories to our tree each year, and from those preschool years?
Character.

But this is helpful for me, too, though, as I find myself trying to make Christmas gift plans for my students' families. Scholastic books with a pencil? Nah. (Great gift, but nah.)

So without further ado, my top 3 Favorite Ornaments on our tree:

In 1st place, there's the
  adorable
 Lil' Fingers Snowmen Ornament. 
I love this ornament because it captures my little girl's hand print and freezes it in time. She may grow, but I'll always have evidence that she was once little. This will be cherished for a long time.

Materials?
A bunch of bulbs (the ones in the photo are transparent)
Confetti to fill the transparent bulb
White tempera paint for hand prints
Black Tempera paint for snowman features..and I think there's red in there, too
Attached Poem:
These aren't just five snowmen,
As anyone can see.
I made them with my hand,
Which is a part of me.
Now each year when you trim the tree,
You'll look back and recall
Winter of 2013
When my hands were just this small!

In 2nd place, there's the 
Good Ol' Popsicle Stick Picture Frame.
To clarify, I LOVE this one - complete with a Christmas drawing, capturing her beautiful art. No Christmas tree is complete without a popsicle stick frame.

And in 3rd place,
except this is my baby we're talking about so they're all in 1st place, the
Kiddie Painted Light Bulb.
It's an actual light bulb with a copper wire loop fashioned around the light bulb's base - and it was fastened in such a way that I've never had to fix it. 
Which is amazing.
I wish I could explain how it's fastened. There are loops on both ends of the wire, which is looped a few times around the bulb's base. The loops are secured around the wire, and it's shockingly tight enough. 
This is a great ornament craft because it's such a unique canvas for a child's painting. Full disclosure, though, I faintly remember our cousin creating this with our daughter at Thanksgiving a few years ago. The light bulbs would get costly with a whole classroom of kiddos.

And I want to add one more:
Totally Awesome Cookie Cutter School Picture Ornament...
...with options to hang on tree or stick on the 'fridge.

We (or rather I and a volunteer) made these ornaments for the kids last year. It's a Pinterest idea, but I can't find the link back to that pin.
Materials:
Cookie Cutters
Scrapbook paper (I bought a bunch of glitter papers)
Ribbon (to decorate around the perimeter of the cookie cutter)
Magnetic tape
Glue gun (and burnt fingers)
The perseverance of a... teacher
High tolerance volunteer
And totally awesome school photos 

I know you love mine

I haven't decided, but I'd really like to NOT make these this year. The idea is cute, but unless you're a perfect craftsman (or woman), they're labor intensive. I guess the Pinterest idea was more for home crafts. 
Yay ambitious me!

This year, I'm leaning toward #1 on my Favorite Things list above, OR #2 because popsicle stick gifts are sweet. 

I hope you enjoyed my addition to My Favorite Things: Holiday Edition, and are walking away with some classroom holiday craft/gift ideas!